OAuth, a practical introduction with examples using the Twitter API
If you're a webdeveloper and haven't heard of OAuth yet, you've been living under a rock. Apparently you moved though as you're reading this. In this article I'll try to explain the concept behind OAuth, give a quick overview of the technique behind it and give a real-world example using the Twitter API and a PECL package called OAuth.
Why do I need OAuth?
OAuth stands for Open Authentication and is a protocol to authenticate users of your service to an external service without those users handing over the credentials of the external service over to you. Why is this interesting? Imagine some community site allowing you to show your tweets somewhere on your profile. Would you be comfortable handing over your Twitter username and password? Not really right? Apart from that, all you wanted the community site to allow was show your last N tweets. With your actual credentials you have also given them power to follow, unfollow, delete and create new tweets, change your bio and more. Not exactly the situation you had set out for.
Solving this problem is exactly what OAuth is meant for. With OAuth the community site will not need your credentials itself, instead at the end of the process it will receive a token. This token can then be used to sign requests, thus showing access has been granted, to an API.
Furthermore the idea of OAuth is that you could accept access for the community site only for very specific use-cases. As mentioned above this would enable you to allow one 3rd party to follow and unfollow, while another 3rd party is only allowed to tweet on your behalf. Sadly Twitter does not support this so half of the benefits OAuth offers is thrown down the drain. Any application having OAuth access to your account is still able to perform any action, as long as the API enables it. That, however, is Twitters neglect, not OAuth's.
So how does it work?
I will not go in to great of the specifics of the OAuth workflow, but to fully appreciate the following code-snippets, a global understanding will be helpful. To use OAuth to access data trough an API you need to aquire an access token. Before you get this token there are several necessary steps. First of all a request token is acquired from the OAuth provider. This token is not yet user specific, it is merely the start of our OAuth session. This request token needs to be personalized and authorized next.
The authorization of this request token is one of the vital points in the OAuth workflow. The consuming application redirects the user to the providing applications website. Here the user can safely login (thus not handing over his/her credentials to a 3d party) and grant access. If the user does exactly that, the providing application returns an authorized request token back to the requesting application. Finally this authorized request token needs to be exchanged for an access token. This access token then can be used to access resources trough an OAuth protected API.
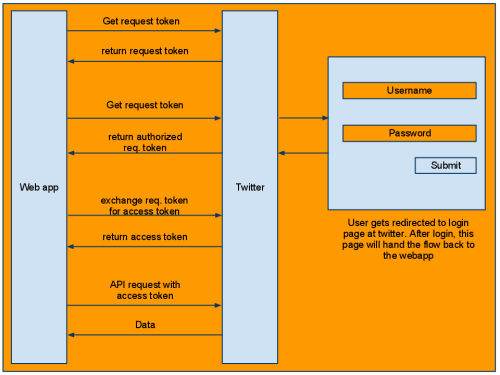
Fig. 1: Schematic overview of the OAuth workflow.
Enough with the theory!
Above you've read a very short and incomplete introduction to the theories behind OAuth. For more info go here and here, because this article will now go into practical details. I will assume you have required an application key and secret by filling out this form. I will also assume you have installed the OAuth PECL package as I will use it in the following examples. First of all we're going to acquire our request token at twitter:
$requestUrl     = 'http://api.twitter.com/oauth/request_token';
$authorizeUrl   = 'http://api.twitter.com/oauth/authorize';
$callbackUrl    = 'yourdomain.com/access_token.php';
$consumerKey    = 'your_key';
$consumerSecret = 'your_secret';

session_start();

$OAuth              = new OAuth($consumerKey, $consumerSecret);
$tokenInfo          = $OAuth->getRequestToken(
    $requestUrl .
    '?oauth_callback=' .
    $callbackUrl
);
$_SESSION['secret'] = $tokenInfo['oauth_token_secret'];

$location = $authorizeUrl . '?oauth_token=' . $tokenInfo['oauth_token'];
header('Location: ' . $location);
So whats happening there? First of all we define some variables holding our endpoint URL's and consumer key and secret. Then the OAuth object from the PECL package is instantiated and a request token is, well.... requested :). The token secret is stored in a session for later use and finally we redirect the user to twitter to authorize the request token. Remember this redirecting is one of the key features of OAuth, a user enters its credentials at the corresponding service, not at a third party's website.
At the location the user is redirected to, he/she will get the question to accept or decline the authorization of the third party. You may have noticed the oauth_callback $_GET parameter. This is necessary to tell Twitter where to redirect the user after access was granted. Below the content of a possible access_token.php:
$accessUrl      = 'http://api.twitter.com/oauth/access_token';
$consumerKey    = 'your_key';
$consumerSecret = 'your_secret';

session_start();

$OAuth = new OAuth($consumerKey, $consumerSecret);

$OAuth->setToken($_GET['oauth_token'], $_SESSION['secret']);
$tokenInfo = $OAuth->getAccessToken($accessUrl);

$token  = $tokenInfo['oauth_token'];
$secret = $tokenInfo['oauth_token_secret'];
Some stuff will look familiar, but I'll walk trough the code real quick. Again some definitions and the construction of our OAuth object. After that we set the authorized request token and the secret we stored earlier in the OAuth object. These are needed so the object can internally create a valid request for an access token. Finally the request for an access token is made, and its result is stored in two variables.
So now we have our access token. This token is to be used with each request accessing the Twitter API. Of course in a serious implementation you would add several things to the code-snippets above. You'll probably want to store the tokens in a database and link them to a specific user. Furthermore there is not even a little bit of error-handling in either of the snippets. The OAuth operations all throw Exceptions on failure so you should add try-catch statement and error handling to your actual code.
$OAuth->setToken($token, $secret);
$message = 'Tweet for demo purposes :x';
$postURL = 'http://api.twitter.com/1/statuses/update.json';

try {
    $OAuth->fetch($postURL, array('status' => $message), OAUTH_HTTP_METHOD_POST);
} catch (Exception $E) {
    //Oh Snap! something went wrong
    var_dump($OAuth->getLastResponse());
    var_dump($OAuth->getLastResponseInfo());
    var_dump($E->getMessage());
}

//success! Lets see what Twitter reports back.
var_dump($OAuth->getLastResponse());
In the last bit of code we again set some token information, but this time the information received while requesting an access token. You can see I added a try-catch statement and some debug output this time, but as long as the message will change (Twitter will throw errors if you post the same message twice in a row in short space of time), the code will work. The OAuth object has a function fetch which, disregarding how strange it sounds, can also perform post requests. In the code fetch receives an url, an array with parameters (including our statusupdate) and the HTTP method it should use. On success the code will dump twitters response, on failure it will do the same and add some more debug information.
So in less then 50 lines of very non-production ready code we managed to tweet from an external application. Pretty easy as such, but please do keep in mind that all sorts of things are still missing. As mentioned earlier the information (tokens) are not tied to a user at our side yet, there is no error-handling whatsoever, there are no security measures taken, you may want to use something else then the global session variable, etc. This post offers an example, you may do the hard work yourself ;)
I just hope it will help some of you with that hard work while consuming an OAuth service. For more information on Twitters API read here. For more information on the OAuth class, read the excellent PHP.net docs. For more information on OAuth in general, go here and here.
Comments
-
Wrote on October 31, 2011 at 4:43:14 AM
Excellent tutorial. I've been working on switching my smf based forum communities over to OAuth as it seems most of the larger online communities are already using it for user authentication. It definitely seems to provide a lot of advantages while simplifying user management on my end.
-
Wrote on December 7, 2011 at 3:25:21 PM
Great tutorial! Having a practical example helps quite a buit in being able to wrap my head around this!
-
Wrote on October 6, 2012 at 5:37:25 PM
Wow, thanks, just what I need to get unwedged. I haven't entirely been under a rock, but have managed to avoid dealing with OAuth until now. Finally, a simple explanation I can understand with straightforward illustration code. A fog has lifted.
-
Wrote on August 9, 2013 at 6:13:25 AM
Every Twitter twitte , status, etc ....
-
Wrote on February 26, 2020 at 5:55:36 AM
This tutorial is sequential, uncomplicated and shorter which makes perfect perception to start out Discovering
SAPUI5. I think this video tutorial is an extensive.The training curve for SAPUI5 could be steep If you're coming
from an ABAP track record.Before you can discover
UI5 you might want to have a good grasp on JavaScript.
 After about 10 years of professional development at both